Segmentation is a powerful tool in Mumara Campaigns that allows you to divide your contact list into smaller, more targeted groups based on specific criteria. This enables you to send more personalized and relevant content to each segment, improving engagement and the overall success of your campaigns
Navigate to the “Lists” section in the side menu.
Click on “Segments” to view or create new segments.
Select “+Add New” to start defining a new segment.
Provide a distinctive name for your segment that easily identifies the group you’re creating.
Based on Contact Lists: Create segments from one or multiple lists by using shared field values or statuses.
Based on Statistics: Form segments based on delivery reports, engagement metrics like opens, clicks, or interactions with your broadcasts.
Create highly targeted segments of your contacts based on specific lists or groupings. This segmentation is particularly useful when you want to send tailored content to contacts based on their list membership and profile fields, which might represent different stages of the customer journey, interest groups, or demographic categories.

Choose from the following options to decide which contacts to include in your segment based on their list information.
1. Select List
Admin Lists: Select the admin lists only.
User List: Selecting this option will include all user lists.
Any List: Select this to include contacts from all your lists without any specific list criteria.
2. Criteria
Any List: Any list of the Admin or User.
Selected Contact Lists: Pick specific lists you want to include in your segment.
Member Of: Choose this to include all contacts from certain list groups you select, including any new contacts added to these groups later on.
Custom Criteria: This option will auto-select the contact lists or groups based on the matching keyword you enter. e.g., where list name is, isn’t, contains, doesn’t contain customers.
Advanced Criteria: It gives you an option to select bulk contacts based on multiple conditions e.g. where a recipient is a member of List A, but not a member of List B, C, and D, or where a recipient is a member of List A, and C and also a member of List B, etc.

Refine your audience by applying various filters.
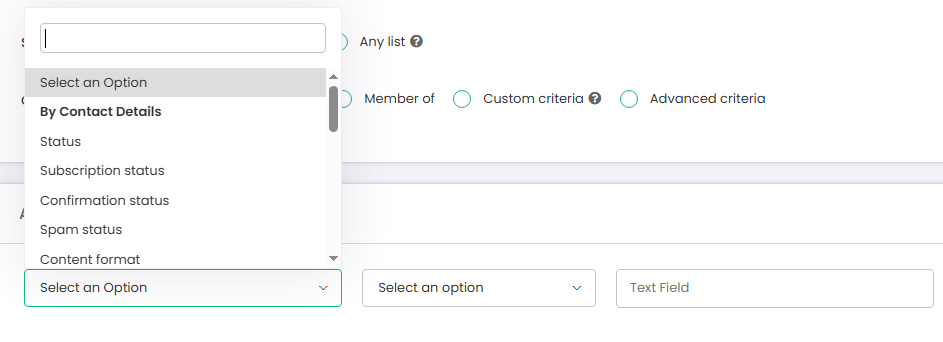
Contact Details
Status: Determine if the contact is active or inactive.
Subscription Status: Filter contacts who have opted in or out of your communications.
Confirmation Status: Choose contacts based on whether they have confirmed their email subscription, helping to ensure compliance with email marketing laws.
Complaint Status: Avoid sending emails to contacts who have marked your emails as spam by filtering out those with a complaint status.
Content Format: Segment contacts based on the format of the broadcast content they have engaged with, such as HTML or plain text emails. This can inform how you design future emails for specific segments.
Creation Date: Focus on contacts who joined your list within a specific time frame. This can be useful for targeting new subscribers with welcome sequences or long-time subscribers with loyalty rewards.
Bounce Status: Focus on contacts with a history of email bounces to clean your list or address deliverability issues.
Suppression Status: Exclude contacts that have been suppressed, often due to marking emails as spam or continuously not engaging.
Profile Fields
Email: Use this filter to include or exclude contacts based on their email addresses.
First Name / Last Name: Segment contacts by their first or last name, allowing for personalization.
Birth Date: Select contacts based on their birth date for birthday-related campaigns.
City / State / Country: Target contacts by geographical location, which can be essential for location-specific offerings or compliance with regional regulations.
Any other profile field!

This segmentation allows for dynamic and targeted communication by grouping contacts based on their interactions, behaviors, and delivery statuses. It’s essential for creating highly focused segments that resonate with the specific engagement patterns of your contacts. Here’s how you can use each filter effectively:
Filter by Activity
Segment contacts based on specific actions that the recipients have taken in response to your broadcasts. You can fine-tune your audience based on their level of interaction.
Broadcast Source
Admin broadcasts: Select the broadcasts that are created by the admin.
User broadcasts: Get the broadcasts that are under users.
Any broadcast: Select this to include all broadcasts without any specific list criteria.
Broadcasts
Any Broadcast: Select this option to include contacts who have taken any action (like opening or clicking) in any of your broadcasts. This is useful for a general engagement level overview.
Selected Broadcasts: Use this option to focus on contacts’ actions within specific campaigns. This is particularly valuable if you want to understand the engagement or follow-up with contacts from particular broadcasts.
Engagement Criteria
By Activity
Has Opened: Include contacts who have opened the broadcasts. Ideal for re-engaging active users.
Hasn’t Opened: Target those who haven’t opened your emails, useful for reactivation campaigns.
Has Clicked: Select contacts that have interacted with links in your emails, showing interest.
Hasn’t Clicked: Focus on contacts that haven’t interacted, to entice them with different content.
Has Unsubscribed: Segment out those who have opted out of your communications, for list hygiene.
Has Complained: Identify contacts who marked your emails as spam, for quality control and to avoid sending further emails that could damage your sender reputation.
By Delivery Status
Sent: Include contacts to whom Mumara ever had sent an email. Use this to gauge overall outreach.
Never Sent: Target those who have not yet been sent a campaign. This can be useful for reaching out to new or overlooked contacts.
Injected into MTA: Select contacts whose emails have been processed by your Mail Transfer Agent but not necessarily delivered. It’s useful for technical analysis and troubleshooting.
Delivered: Focus on contacts who have received your emails. It ensures engagement with users who are actually getting your messages.
Delayed: Identify contacts who experienced delivery delays. This can inform you about potential deliverability issues.
Bounced: Filter out contacts with email addresses that could not receive your email. This helps in cleaning your lists and improving deliverability rates.
Segmenting Contacts Based on Email Interaction and Demographics
When creating a segment with the criteria “Has Opened,” you can further narrow down your list of contacts by combining it with additional conditions.
Has clicked on a link: This option allows you to target contacts who have opened your emails and clicked on an enclosed link. Choose “Any Link” to exclude the link-specific filters.
Hasn’t clicked on any link: This option allows you to target contacts who have opened your emails but have not interacted with any links. It’s useful for identifying users who are interested but haven’t taken action.
Country: Choose “Any Country” to include all contacts regardless of location or “Selected Countries” to target contacts based in specific countries.
State: Similar to country, select “Any State” for a broader segment or “Selected State” to focus on specific states.
City: Use “Any City” for inclusion of contacts from all cities or “Selected Cities” for targeted urban areas.
Zip: You can either include all zip/postal codes with “Any Zip” or specify particular areas with “Selected zips”.
Browser: If browser data is relevant to your segmentation, choose “Any Browser” to ignore this criterion or “Selected Browsers” to focus on users of specific web browsers.
Operating System: Choose “Any OS” for all operating systems or “Selected OS” for particular ones, which can be particularly useful for software or app-related campaigns.
Duration: You can ignore the duration with “None,” or choose “By Date” to segment contacts based on when they opened your emails.
After: Target contacts who performed an action after a specified date.
Before: Select contacts whose actions occurred before a certain date.
Exactly On: Focus on contacts who acted on the exact date you specify.
Between: Segment contacts who were active within a specific date range.
Occurred Before: Use this to include contacts whose activity happened prior to a certain point in time, such as a billing date passed two days ago.
For the past: Choose this option to target contacts based on a recent period of activity, such as the past week or month.
Older than: This will segment contacts who engaged with your emails or website before a certain time period, useful for re-engaging with older leads.
Geo Filters Dependency
When you’re creating a segment and want to include geographic details, it’s important to follow the hierarchy of selection:
Country: Begin by selecting the country or countries of interest. This is the broadest geographic filter and sets the stage for more specific targeting.
State: After selecting a country, you can choose states within that country. The available states to choose from will depend on the country or countries you’ve already picked.
City: Similarly, once states are chosen, you can select cities. The list of cities will be filtered based on the selected states.
Zip: For the most granular geographic targeting, you can choose zip codes, which will be available based on the cities selected.
Additional Filters
Add additional filters to further narrow your audience.
Contact List: Filter contacts who are subscribed to specific mailing lists. You can choose to include contacts from one or multiple selected lists.
Sending Node: Segment contacts based on the node that was used for sending emails. Select the specific node(s) from the available list to include in this segment.
Sending Domain: Filter contacts by the domain used to send the emails. You need to specify which sending domains to include by selecting from the list of domains you have used.
Send From Email: Segment contacts who received emails from specific ‘From’ email addresses. Write in the email address and use the appropriate operator, e.g., is, isn’t, contains, doesn’t contain.
Bounce Email: Filter based on the bounce email address associated with the email sent. Choose from a list of bounce email addresses that have been used in your campaigns.
Recipient Email: Include contacts by specifying their email address or a part of it, e.g., @hotmail.com, richard@, etc.
Schedule Label: As the broadcasts are organized and tracked with specific labels, you can filter contacts based on these schedule labels.
Message-ID: Use the unique Message-ID header of the email sent to segment contacts. Write into the textbox to get the matching recipient(s).
Subscription Status: Segment contacts according to their subscription status, e.g., Unsubscribed, Not Unsubscribed.
For each of these categories, the interface will present selection tools such as dropdown menus, checkboxes, or search fields to allow for a precise and user-defined selection process. It is mandatory to make selections in these fields to proceed with filtering.
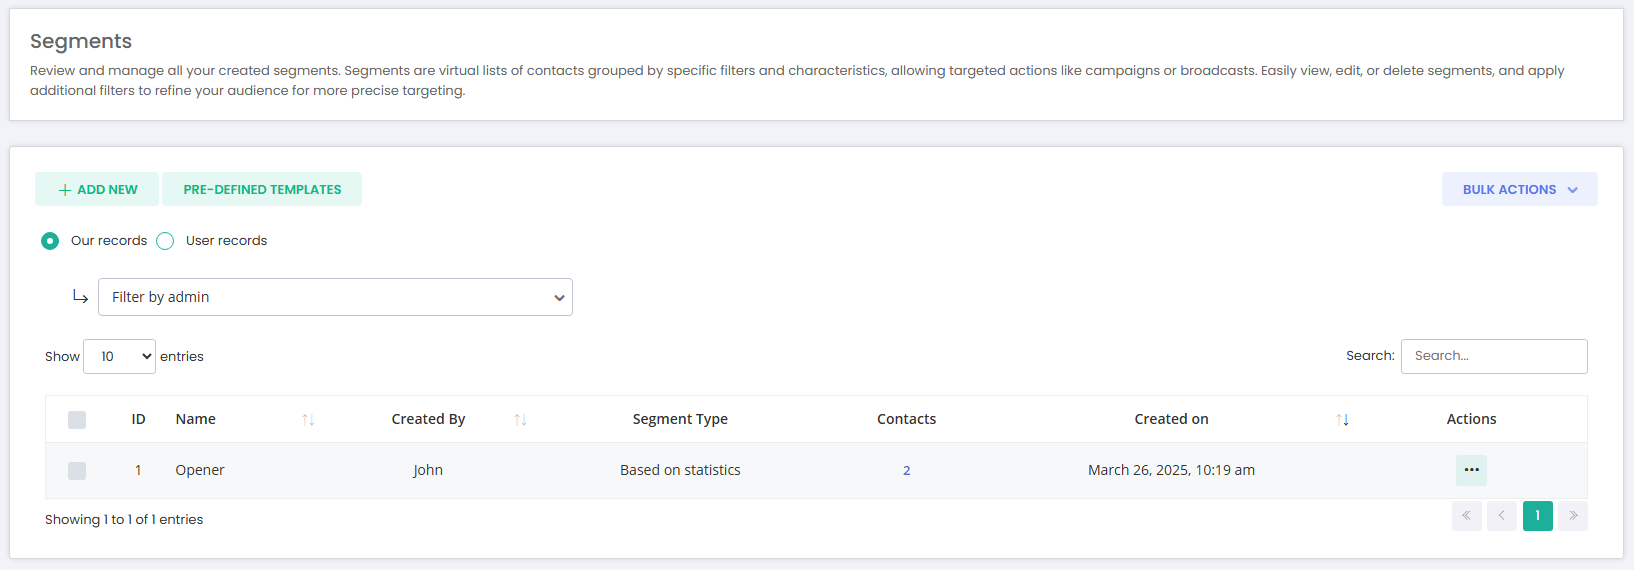
On the Segments page, you will see a list of all created segments. Here you can quickly glance at the key details for each segment, including:
Field | Description |
ID | A unique ID of the segment in the database. |
Name | The given name of the segment for easy identification. |
Created By | Who created the segment, useful in multi-user environments. |
Segment Type | Indicates whether the segment is based on contact lists or engagements. |
Contacts | Number of contacts currently within the segment. |
Created On | The date and time the segment was created. |
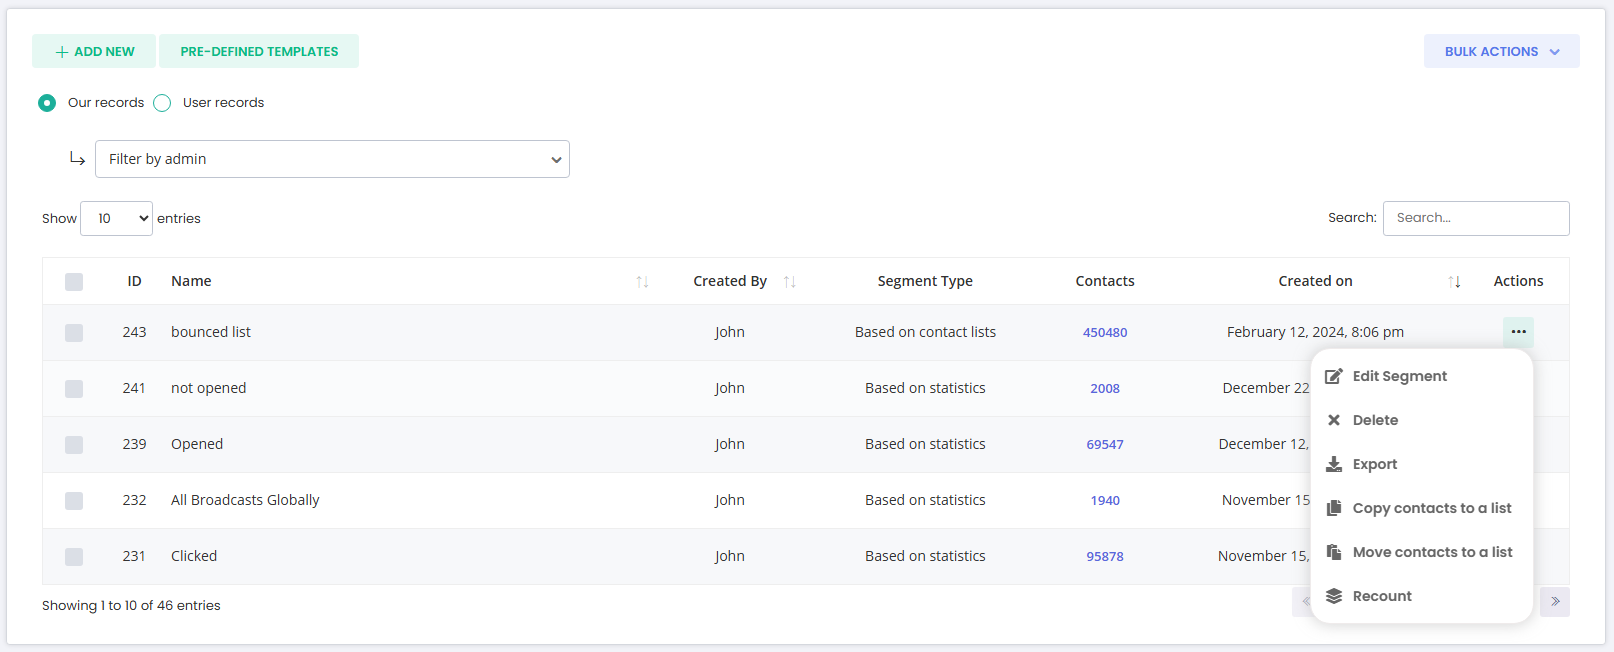
Various operations can be conducted from the “View Segment” page:
Export: Export and download the segmented contacts in a CSV file.
Copy Segment to a List: Duplicate the segmented contacts to a new contact list. It will copy the qualified contacts from all contact lists to a new list.
Move Segment to a List: It will move the segmented contacts from the original lists to a new list.
Recount Segment: Update the count of contacts in the segment based on current data.
Edit Segment: Modify the criteria or the properties of a segment.
Delete: Remove the segment entirely from Mumara.
This feature allows you to create a CSV file of your segmented contacts with customizable data fields. This tool provides flexibility to include various contact profile fields, geographical location, and even engagement activities, to enrich the data exported. It’s particularly helpful for tailored marketing strategies or in-depth analysis.
For instance, you may want to include the contact’s first and last name, birth date, city, state, country, zip code, mobile number, phone number, company name, and title in your exported file for a comprehensive view of your segment. This added data can help in understanding the demographics and behavior of your contacts, which can be pivotal for targeted marketing campaigns or customer relationship management.
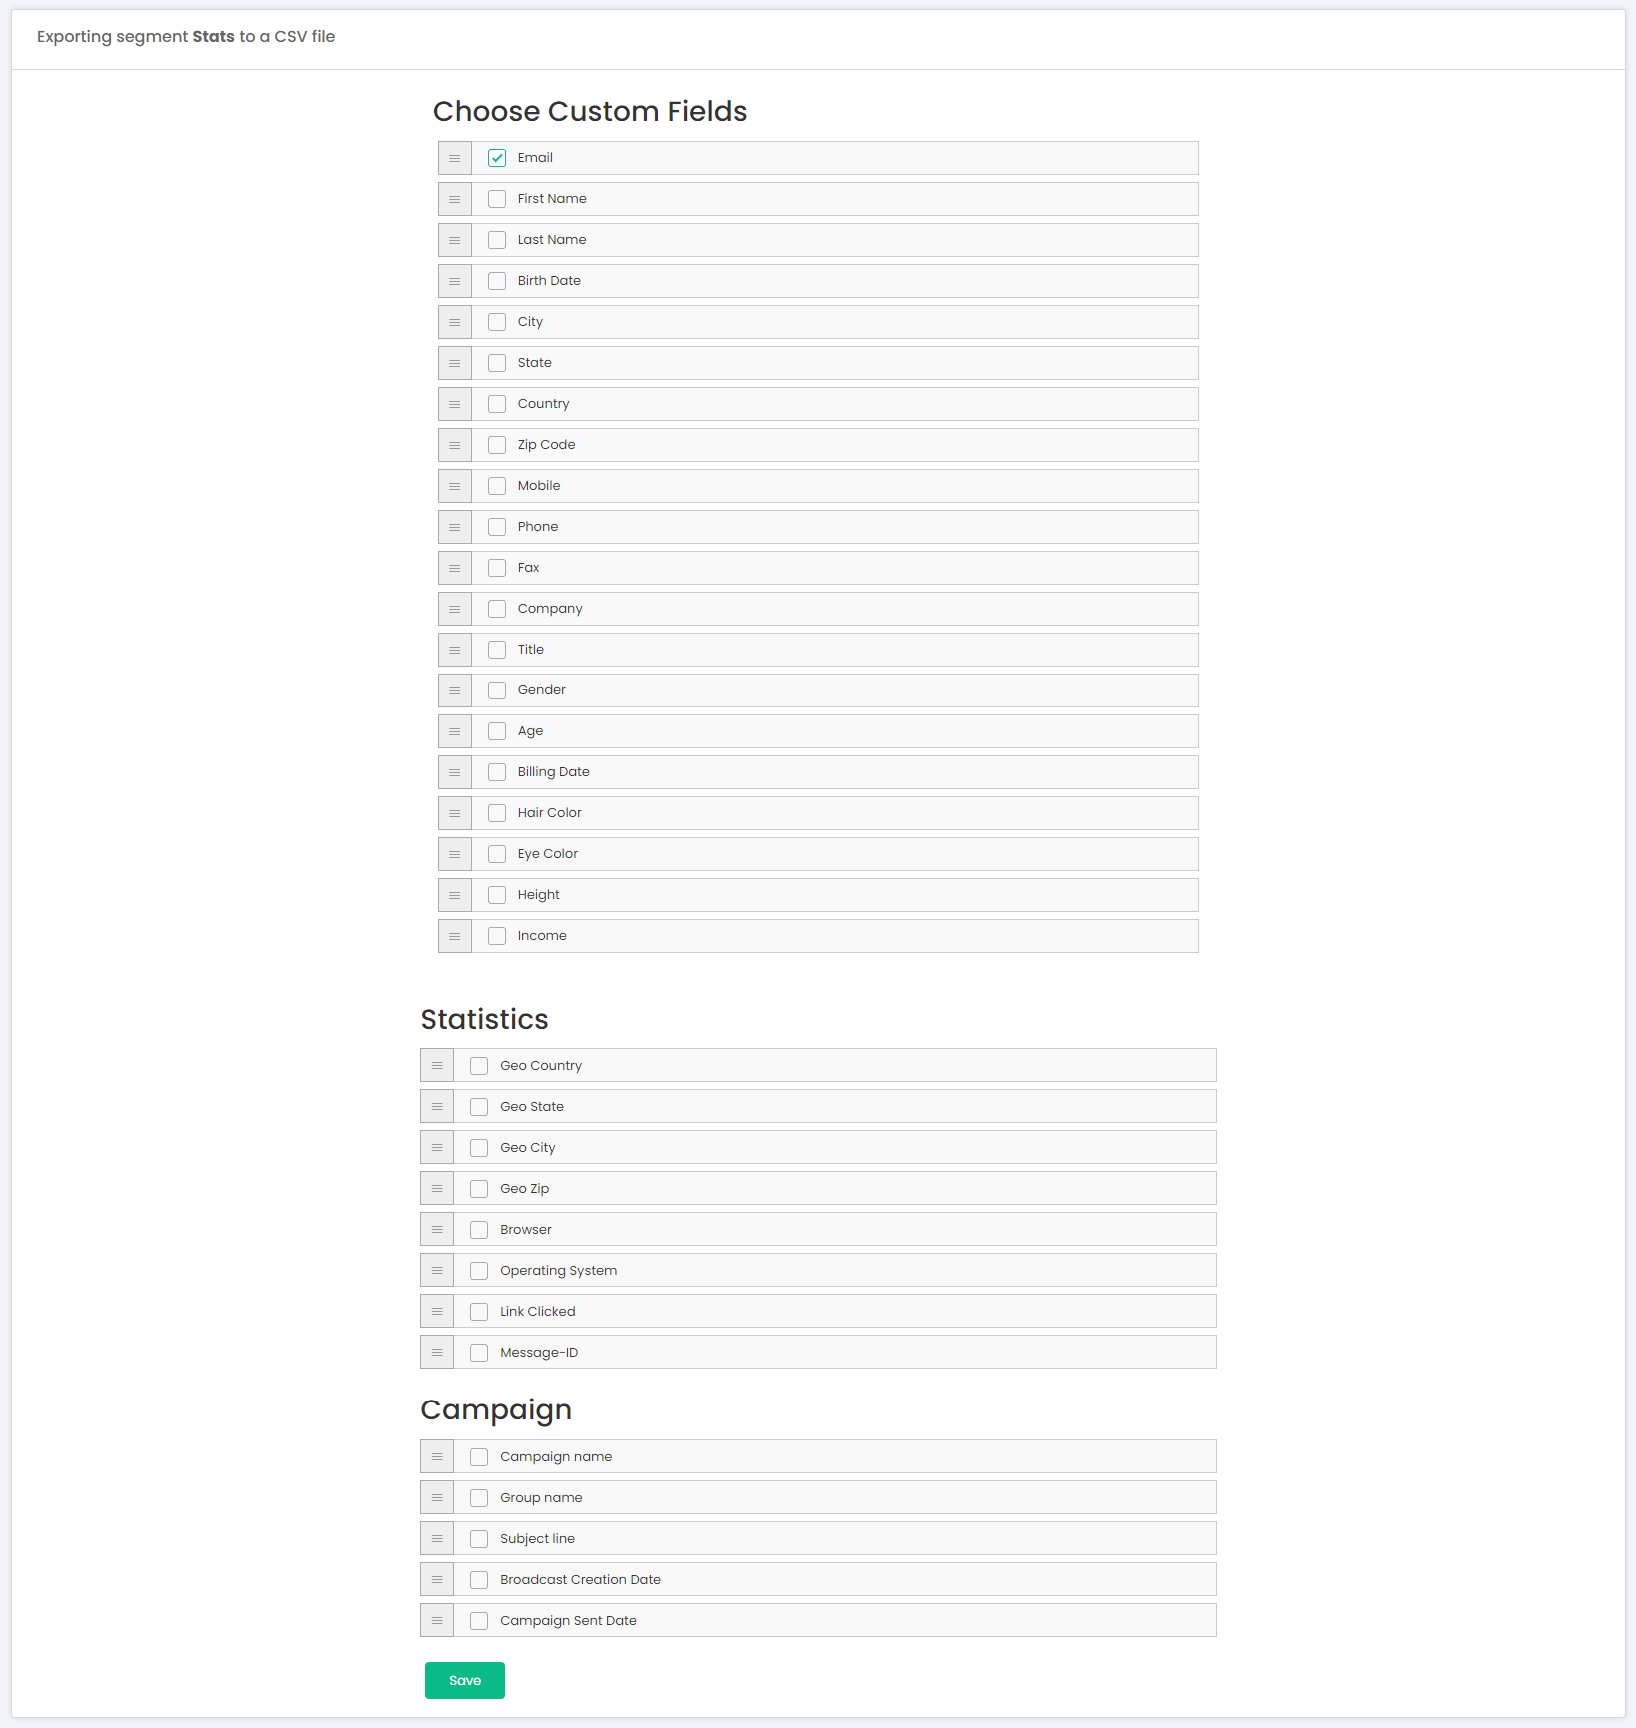
When you click on the export option, simply select the desired custom fields you wish to include in the export. You can choose from a list of available fields which may include email, name, location details, contact information, and more. After selecting the required fields, click the ‘Export’ button to generate the CSV file with the specified data. Moreover, you can re-arrange the sequence of the CSV file columns by using the simple drag and drop feature.
This functionality not only streamlines the data management process but also empowers you with the ability to customize the exported data according to your business needs. Whether you’re planning a location-specific campaign or need to update your records, the export segment feature simplifies these tasks.
When you have exported a segment, the process starts in the background, and you can see the live percentage of the export operation on this page. Once the process is complete and the exported file is ready, it should become available for download. The download option appears at several places as mentioned below.
1. Right in front of the Segment

2. In the top Downloads dropdown
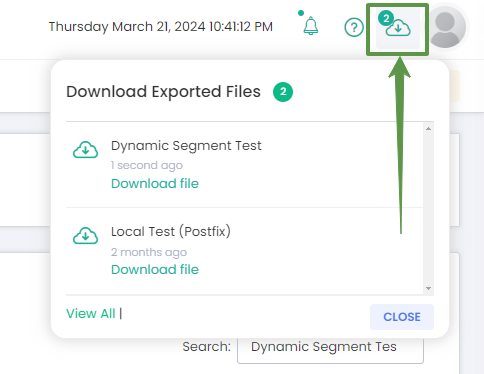
3. In the Exported Files section by navigating to Tools -> Exported Files.

The exported files will remain available before they are automatically deleted. This duration is controlled by the retention value set in the “Application Settings” under the “Security” tab.
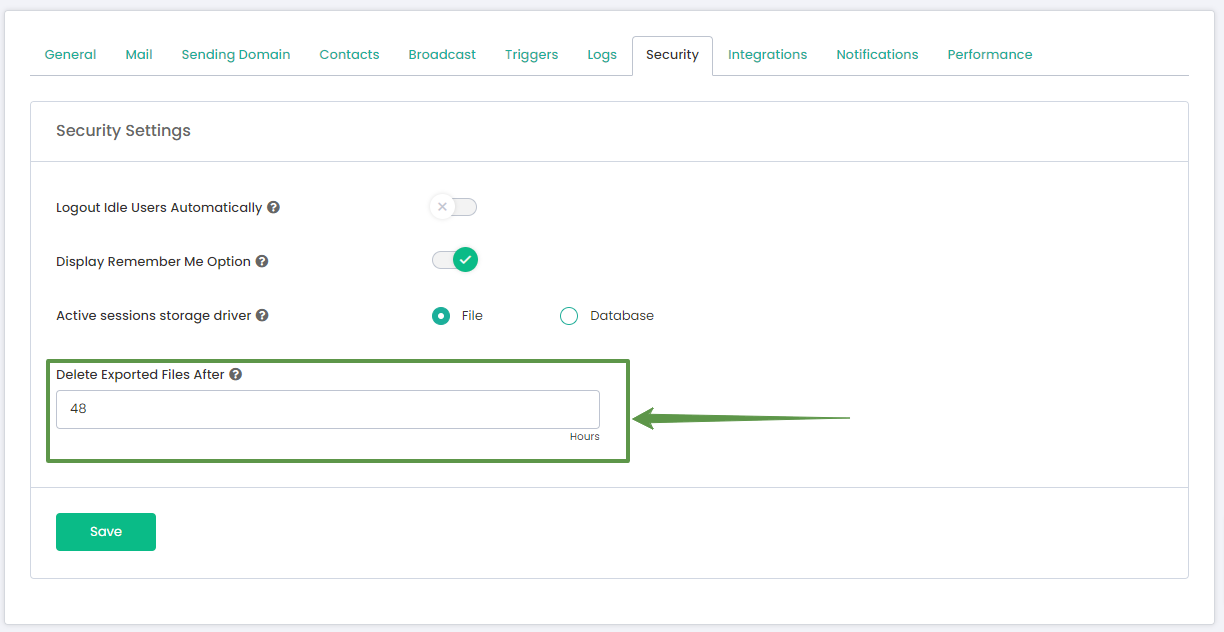
When you export data from the system, whether it’s segments, contact lists, or any other reports, the system retains these files for a predetermined period as specified in the settings. Once the set number of hours passes, the system will automatically purge these files to maintain data hygiene and manage storage space effectively.
Copying or moving segmented contacts to a list in your application is a straightforward process that allows for enhanced list management and targeted campaigns. Here’s how it generally works:
Selecting the Segment: Choose the segment you’d like to work with from your list of segments.
Copy/Move Action: From the Actions dropdown, click on “Copy Segmented Contacts a List” or “Move Segmented Contacts to a List”, which will open a popup.
Destination List: Decide on which existing list you would like to copy or move the segmented contacts to. You can often create a new list at this stage if you need one.
Duplicate Handling: Determine how you want the system to handle duplicates. Options typically include:
Skip: If a contact already exists in the destination list, it will not be copied or moved.
Overwrite: It will replace the existing contact with the new contact information. In short, the contact in the targeted list will be deleted and re-added with new information.
Update: The contact in the destination list will be updated with any new information from the segmented contact.
Delete: The contact will be removed from the original segment without doing any operation.
Executing the Action: Once you’ve configured the settings, proceed with copying or moving the contacts. Depending on the system, you might see a progress indicator or receive a notification upon completion.
Refine your audience by applying various filters.